For the last year or so, ChatGPT has been in the front of the news, and millions of people have been using it. Startups have been formed that are completely prompt engineering using the ChatGPT API. No, I’m not launching a new GenAI product, but I am really liking some of the code I have created using the ChatGPT API, so I thought I might share it with everyone.
The Chat GPT API – saving you money
To use the GPT-4 model in the ChatGPT app, you need to subscribe at $20/month. And you know, if work is paying for that – this is awesome.
But, I was unemployed for a bit in 2023, and I still wanted that sweet sweet GPT4 content – but that subscription did not make the unemployment cut. The I learned that if you spend $5 in your API account – you get GPT-4 access from the API! So I did it – I spent a week playing and building a few Jupyter Notebooks – and using the API for all my queries, I used up about 15 cents of my API credits. So, if you are using ChatGPT a few times a day, you can save yourself the $240/year, and probably use less than $5 of API calls using GPT4 in an entire year.
Jupyter Notebooks
I have been using Jupyter Notebooks for a few years now, and they have a similarity to the GenAI chat of ChatGPT – so I though it would be an easy way to build my own chat interface. The notebooks are all on Github, so feel free to play around with them.
To use these sample apps, you’ll need Jupyter Labs installed on your computer (install instructions in the Jupyter Notebook link above). The Note book is the Supercharged GPT notebook:
Initializing the chat
The first three cells of the Notebook are just setting the scene:
First, we pull in all the libraries we need, and set our API key (using environmental variables)
#imports all the required libraries, and creates the OpenAI client

from openai import OpenAI
from dotenv import dotenv_values
openaikey = dotenv_values(".env")['openai_apikey']
client = OpenAI(
   api_key=openaikey
)
Next, we initialize all the variables that can be used in the ChatGPT API.
# initial variables that will be used by ChatGPT.
# Update the startMessages to the context you would like used.
# This is where you can tell CHatGPT the persona you would like it to take on.

useModel = 'gpt-3.5-turbo'

#use either Temperature or top_p, but not both.  Both default to 1.
useTemp  = 0.2
useTopP = 1
startMessages =[
    {"role": "system", "content": "You are a assistant with a penchant for scientific rigor. Your responses will be verbose but always accurate. If there is uncertainty in your answer, it should be stated explicitly."}
]
useMessages=list(startMessages)
usemaxTokens =None
numberofChoices = 1
useFrequency_penalty = 0
usePresence_penalty = 0
Finally, define two functions: add_chat and reset_chat. after the code, we can talk about what they do.
import json

# Initialize an empty array to store messages
messages = []

#this is the addchat function
def add_chat(role, messageContent):
    # Create a dictionary to represent the chat request
    message = {
        "role": role,
        "content": messageContent
    }
    # Append the JSON object to the 'messages' array
    useMessages.append(message)
    #now make a query to ChatGPT with the new Message array
    response = client.chat.completions.create(
      model=useModel,
      messages=useMessages,
      temperature = useTemp,
      top_p=  useTopP,
      presence_penalty = usePresence_penalty,
      frequency_penalty=  useFrequency_penalty,
      n=numberofChoices

    )
    #when the response comes back, add it t the useMessages array
    newMessage = {"role":response.choices[0].message.role,"content":response.choices[0].message.content}
    useMessages.append(newMessage)
    #print just the chat response
    print(response.choices[0].message.content)
    print(f"This query cost {response.usage.total_tokens} tokens")

#reset
def reset_chat():
    global useMessages
    useMessages = []
    useMessages=list(startMessages)
    print("Messages have been reset to start.")
reset_chat()
ChatGPT’s API has 3 types of messages, a system message, a user message and the assistant message. In the 2nd block of code, we use a system message to tell Chat GPT how to reply in all the messages:
startMessages =[
    {"role": "system", "content": "You are a assistant with a penchant for scientific rigor. Your responses will be verbose but always accurate. If there is uncertainty in your answer, it should be stated explicitly."}
]
If we had made our system message, “You are a swashbuckling pirate with a penchant for colorful language” the tone of the replies will change dramatically. But you could 😀
In the add_chat function, we take an input of the message type, and the message. Typically, the message type is user, as we (as the user) are asking GPT a question. We add this message to the existing array of messages, and send the entire conversation to ChatGPT.
When the response comes back, we add it to the message array, but also print it to the user.
In this way, every time we talk to the API – the entire context of the conversation is sent via API, and the response can take that conversation into account.
The reset_chat function does what it says, and clears out the array to begin a new conversation.
And with that, we have a mini chatbot in our Jupyter Notebook!
add_chat("user","what are the max and minimum distances between the earth and the moon? How frequently do they occur?")Pretty awesome!
Dinkering with parameters
There are a lot of parameters that you can tweak to change the API responses. I think the most common is the temperature – lower values are more consistent, high values produce random results (Accepted values are 0-2).
useFrequency changes how often words can repeat in the response. Allowed values are -2 to 2. Negative values allow for lots of repeating, and some of the results went pretty wacky with weird words showing up over and over.
Its fun to see how modifying the parameters changes the way the responses are created. I remember working on a sound board in high school, and being told not to mess with the knobs above the faders:

The params are like all these buttons and dials – we’re not really sure how they all work, but we can learn how they work through experimentation.
ChatGPT and Hallucinations
Sometimes ChatGPT doesn’t know the answer, and makes mistakes. These are called hallucinations – and I’ve travelled down these rabbit holes in the past. I got some code from ChatGPT – the API endpoint seemed legit, so I worked at my code for a while – only to realize that the endpoint was completely made up!! (argh)
One idea to reduce hallucinations is to run two LLMs side by side. If you ask 2 LLMs the same question, and they both give the same result, it is possible they are both wrong – but it is also likely that the data is accurate. We can add a 2nd LLM to the script, and run them side by side. Then we can feel more assured of the content that comes back.
We’ll use LLama2 as our additional LLM. I installed Llama2 locally on my computer using https://ollama.ai/. Its an easy to use command line interface. Ian Wooten has a great video on how to get started:
In the llama2_chatGPT notebook, I have updated the code from the ChatGPT version, and have inserted the code to make a 2nd call to the Llama 2 instance running locally on my Mac.
Now, when I ask a question, I get two responses!
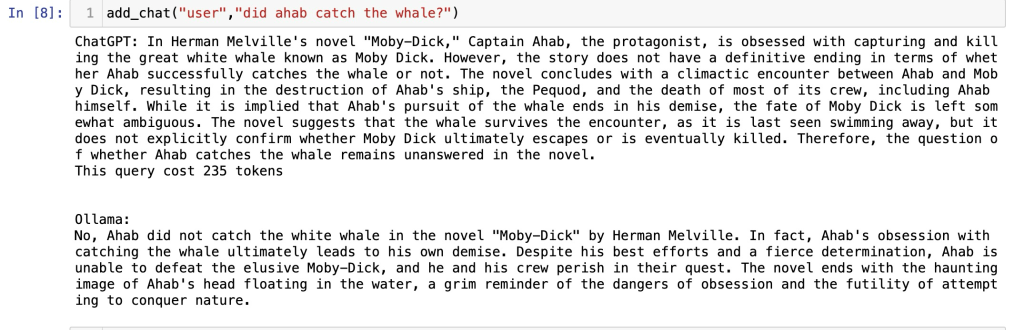
I feel much more confident in the response when the 2 LLMs agree with one another.
Conclusion
These 2 notebooks were fun ways to learn about the ChatGPT API, some of the parameters we can use to tweak the ChatGOT replies, and better understand how LLMs work. They also had the added bonus of saving some money, while still letting me play with GPTs.
Give them a try, and if they are useful – leave a comment – or drop a note in Twitter (I still go there from time to time). If you find a cool tweak- make a PR to the repository- I’d love to see what you’ve done,a nd share it with the world.
