So, I’m building a website for my wife’s project, and I found the perfect WordPress theme for her project. I know that you can run WordPress on Amazon EC2 instances, so I figured that would be the easiest way to go.
There have been roadblocks. I’ve spent a lot of time Googling and working through issues. This post is mostly for me as a reference guide- when I need to do this again. But I hope it will help others who are struggling through the same process.
2/2/23 Note: Read to the end. I ended up using Google Cloud.
All of these setup instructions got me going in GCP faster… but it’s just easier.
Set up your instance
I’ll assume you have a AWS account and you are familiar with EC2 instances. I’m going to run my server on Amazon Linux 2 – micro sized. Ensure your security group allows for traffic on ports 80, 443 and 22 (thats for SSH). I also opened FTP on a terrible rabbit hole I fell into… You won’t need it:

ok. so you have a server. Now we need to set it up for WordPress. WordPress runs on the LAMP stack.. and there is a nice tutorial from AWS on building a LAMP stack. I don’t need (or want) to replicate the AWS post (and it *may* change), so follow that to get your ec2 instance running as a LAMP server.
Set up the database
We installed MariaDB in the AWS instructions, now lets create a WordPress database (to hold all of our pages & posts and data)
First lets start mariaDB, and enable it to run at restart of our instance:
sudo systemctl start mariadb
sudo systemctl enable mariadb
Now, let’s run some DB queries to set up our database (these next few steps are from this tutorial)
sudo mysql -u root
Now we are in mariaDB. Let’s create a database and a user
CREATE DATABASE wordpress;
SHOW DATABASES;
This will create a DB called wordpress, and then show that it was created.
Now, we need a user with permission to access this database:
CREATE USER ‘wordpress’@localhost IDENTIFIED BY ‘<password>’;
I’m being super creative, and giving the user the name wordpress. Now, let’s give this user access to the database we created (and here my nomenclature is confusing – the first ‘wordpress’ is the DB, the second is the user:
GRANT ALL PRIVILEGES ON wordpress.* TO ‘wordpress’@localhost;
FLUSH PRIVILEGES;
Ok, now we have a database running on our instance (which we will need when installing WordPress.
Installing WordPress
We’ll use the WordPress CLI to install. TBH I never got the CLI exactly working – Perhaps I needed to logout and log back in again for the “wp” commands to work.. so I kludged it. I followed the instructions from this post (starting at the install WP CLI – we’ve done the rest already):
I did add a “–” to info – this is not in the post… probably a Medium blogging thing…
curl -O https://raw.githubusercontent.com/wp-cli/builds/gh-pages/phar/wp-cli.phar
php wp-cli.phar --info
chmod +x wp-cli.phar
sudo mv wp-cli.phar /usr/local/bin/wp
Next, navigate the directory that WordPress will be installed into:
cd /var/www/html
Ok, since the CLI didn’t work for me, I installed WordPress with this command:
/usr/local/bin/wp core download
Since this is all I needed the CLI for, I’m cool with the kludge.
Set up Word Press
Now, we’re ready to set up WordPress. Visit the ip address of your EC2 instance in your browser.
NOTE: Chrome defaults all connections to HTTPS. Since your server does not have a certificate – don’t be surprised if you see this:

Just go and change the https to http in the address bar, and this page will appear:

Alternatively – you can use Safari- and the pages always load as http (in my experience).
Ok – back to setting up WordPress. We already set up our database, so you should have the name, username and password. So, “Let’s Go” and do that. There are a couple of pages of steps that yo have to follow – naming your site, and assigning a admin login/password, but in a few minutes the process should be completed!
Ok – you’ve installed WordPress! I ran into further issues configuring my WP instance that I want to describe.
upload_max_filesize and wordpress
I am using a theme for this project that is 6MB zipped. When I attempt to install, I get:
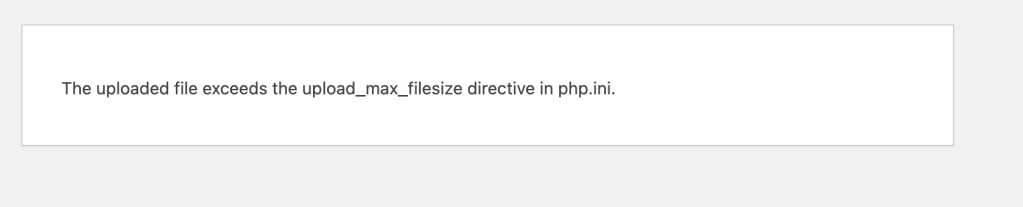
The upload_max_filesize is set to 2 MB. So, to fix this, the error message says “edit the php.ini”. MANY tutorials recommend doing this…. but it does not work. editing this file is no longer allowed in PHP. What you can do is go to /etc/php.d/, and create a php.ini that “appends” the existing php.ini:
sudo vim php.ini
and paste in the following three lines (of course, feel free to change the values if needed):
upload_max_filesize = 50M
post_max_size = 51M
memory_limit = 128M
save and exit VIM. haha, yes, I know this is a terrible joke at the expense of people who have not used VIM a lot. (You can save the file and exit VIM by hitting “esc” and then :wq to save and quit)
You have to restart PHP to get these changes to take effect. Since there is nothing else running on your server – you can just reboot the EC2 instance.
the WordPress ftp rabbit hole
Now, when you retry, WordPress wants FTP access to upload files (I mentioned a rabbithole at the beginning of this post)
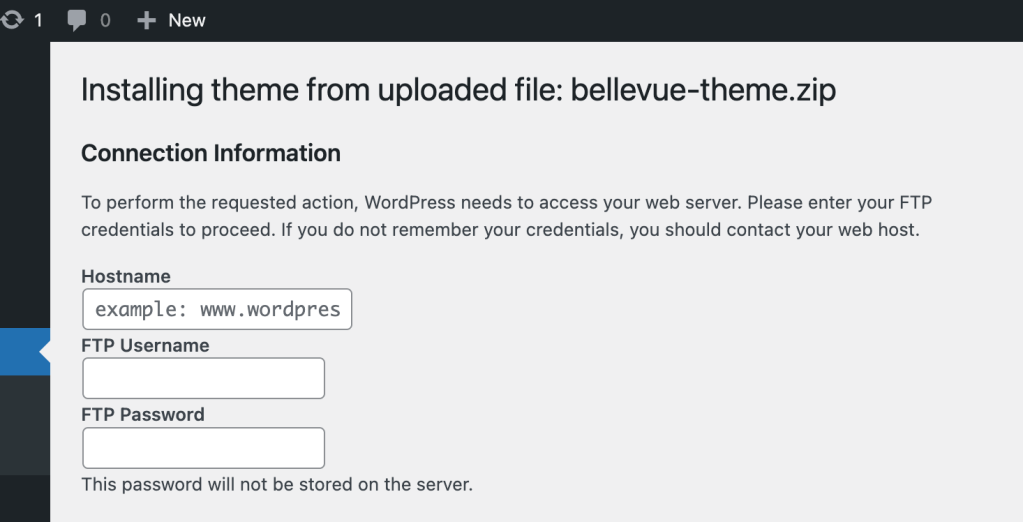
We can bypass this requirement, and force all the uploads in the browser. (Here’s where I found this reference). It requires editing the wp-config.php file”
cd /var/www/html
vim wp-config.php
In the middle of the file, you’ll see these two lines:
/* Add any custom values between this line and the "stop editing" line. */
/* That's all, stop editing! Happy publishing. */
Paste this line in between, and then save and quit VIM (a reminder: “esc” then :wq)
define(‘FS_METHOD’,’direct’);

Now the upload works in the browser, and not Ftp access, and configuration stuff needs to be done.
Addendum
I ran into a bunch of issues with the template I was using that had *something* to do with file permissions. I was doing a project in Google Cloud for work, so I logged in there, and there is a WordPress virtual machine you can just install. You have to do some of the configurations above, but it *just worked* whereas I was struggling in AWS.
So, use Google Cloud, and the prebuilt WordPress VM. It is the same price for a zillion fewer headaches.
I hope this helps you in your WordPress install – and if you have comments or suggestions – please leave them below!
